Introduction: Where Structure Meets Sweetness
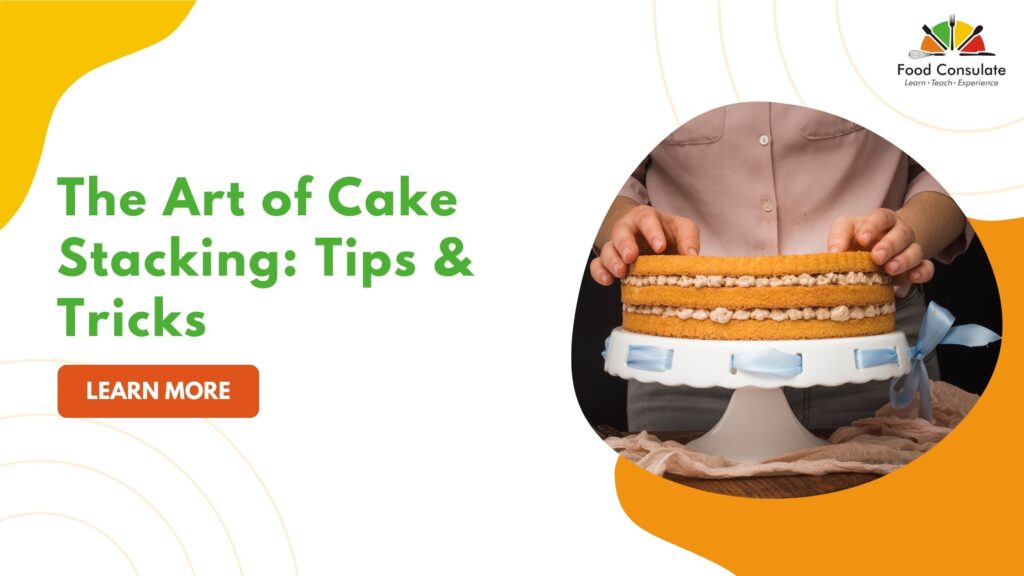
A tall, beautifully layered cake makes a showstopper at any celebration. Be it the masterpiece at a wedding or the centerpiece of a birthday, the elegance in a stacked cake always draws attention. But behind that flawless presentation lies a combination of skill, precision, and engineering.
At Chennai’s premier institute for baking and pastry arts, Food Consulate believes cake stacking is an art any serious baker should master. Well, it is not just piling layers; rather, balance, stability, and visual perfection are built with every layer. Here’s your complete guide to mastering the art of cake stacking, with tips, tricks, and professional insights that will further elevate your craft.
1. Start with Strong, Even Cake Layers
A great stacked cake starts with strong, level bases. Uneven or fragile layers make the entire structure unstable.
- Bake Evenly: The same batter should be used in each pan, and all layers should be baked at the same temperature.
- Trim and Level: When cool, use a serrated knife or cake leveler to trim the tops so each layer is flat.
- Chill Before Stacking: Cold cakes are much firmer and less likely to crumble or shift during stacking.
Pro Tip: Wrap your cake layers in cling film and refrigerate for at least an hour before assembling; this makes handling and stacking much easier
2. Choose the Right Base Board
Your base is your foundation – it should be strong enough to hold the entire cake.
For Cakes that are Single Tier: A thick, sturdy cake board roughly 2 inches larger than your cake works well.
To support multi-tier cakes, each tier needs its own board, but the bottom one requires a thicker drum board due to carrying the total weight of the structure.
Pro Tip: Line boards with foil or wrapping that matches your theme for easy cleanup and no grease stains.
3. Stack on a Stable Surface
Before stacking, ensure your work surface is level and steady. Even a slight tilt can lead to leaning tiers. Use a turntable while stacking for better control and alignment.
Pro Tip: If transporting the cake later, assemble the top tiers on-site whenever possible to minimize damage.
4. Add Structure: Dowels and Support Systems
Here’s where the “architecture” of cake stacking comes into play.
Dowels: Set into each lower tier, dowels take the weight of upper layers and prevent collapse.
Types of Dowels:
- Wooden or Bamboo Dowels – classic and sturdy
- Plastic Dowels – reusable and easy to cut
- Bubble Tea Straws – perfect for light cakes
To use dowels:
- Measure the height of the tier.
- Insert dowels evenly in a circle pattern inside the cake, not touching the edges.
- Cut all to equal length for balance. Pro Tip: Place one long central dowel through the complete cake for extra stability, especially when it will be transported.
5. Fill and Frost Each Layer with Precision
The beauty of a stacked cake lies in its clean, symmetrical layers.
- Buttercream or Ganache as Glue: This should be a sturdy frosting, one that can support weight — avoid extremely soft fillings.
- Crumb Coat: Apply a thin layer of frosting around the cake to trap loose crumbs, then chill before final frosting.
- Final Coat: Smoothen the outer layer, for a polished and professional finish, using either a bench scraper or offset spatula.
Pro Tip: Place each tier on parchment or acetate while frosting, so the base stays clean and mess-free.
6. Center and Align Each Tier Perfectly
Once your layers are supported and frosted, it’s time to assemble the tiers.
- Carefully set the next tier (already on its own board) on top of the doweled base tier.
- Use a bubble level tool to ensure perfect alignment.
- Now, rotate your cake to view it from all sides-symmetry is key!
Pro Tip: Always mark the center of each tier’s board for easier alignment during stacking.
7. Use Chilling as a Stability Trick
Professional bakers rely on chilling to keep their cakes stable during decorating and stacking.
- Refrigerate Each Tier: A short chill time (20–30 minutes) firms up the frosting.
- Chill Between Stacking: Cooling prevents sliding or bulging when adding upper tiers.
Pro Tip: For fondant-covered cakes, avoid over-chilling to prevent condensation.
8. Decorate with Care
Once your cake is fully stacked, it’s time for the fun part — decoration!
- Borders: Apply buttercream borders to cover any visible seams between tiers.
- Fresh or Sugar Flowers: Insert with toothpicks or flower picks to avoid damaging the cake.
- Edible Decorations: From gold leaf to textured piping, the finishing details make your cake a true masterpiece.
Pro Tip: Decorate from the bottom tier upward to keep the cake balanced and avoid any accidental smudges.
9. Transport with Confidence
Moving a stacked cake can be nerve-wracking, but with preparation, it’s stress-free.
- Chill Before Transporting: A cold cake is less fragile.
- Use a Non-Slip Mat: Place it under your cake board inside the vehicle.
- Drive Carefully: Avoid sudden stops or turns.
Pro Tip: For long distances, assemble only partial tiers and complete the final stacking at the venue.
10. Practice, Patience, and Perfection
The stacking of cakes is an art learned through practice. It necessitates the development of steady hands and a keen eye to produce flawless results. Each cake stacked will teach a different lesson in balance, precision, and patience.
At Food Consulate, the science of structure and the art of presentation are taught in our Professional Baking and Cake Decoration Courses, from foundation techniques to advanced tiered cake design. Students not only learn to make delicious cakes, but also structurally sound and visually stunning ones.
Final Thoughts
Cake stacking is where baking meets architecture and artistry. It requires precision, patience, and creativity-but once you master it, the results are breathtaking.
These cake stacking tips and tricks will indeed give you the confidence to build tiered cakes that stand tall, stay stable, and steal the show. So next time you design a layered beauty, remember-every tier tells a story, and your skills make it stand tall.
From the amateur baker to the professional pastry artist, Food Consulate Chennai will guide you through techniques that will transform simple cakes into edible works of art.